ZeroBot - "Off-Road" Version -- Raspberry Pi Zero FPV Robot
prusaprinters
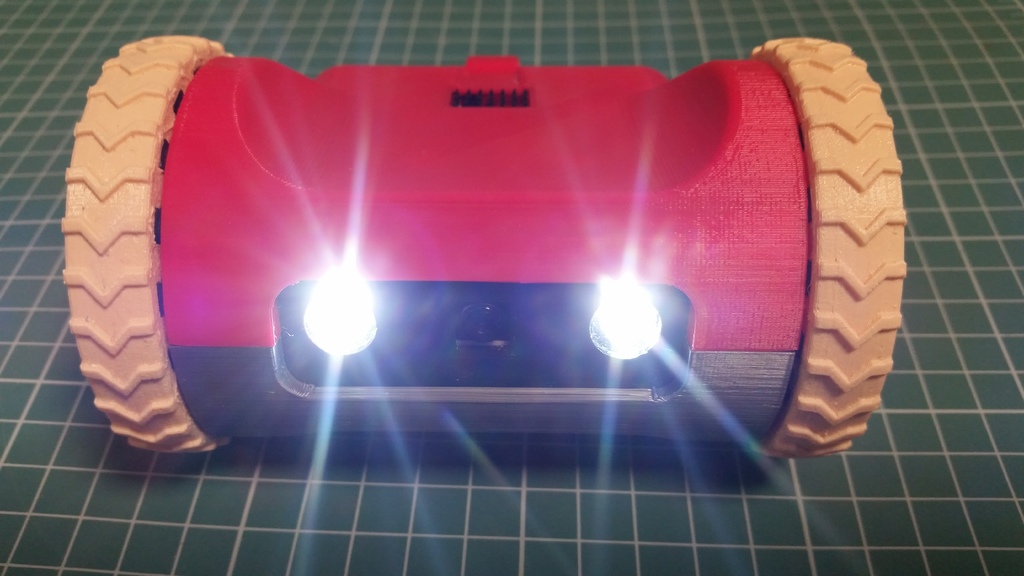
<p>This is a remix of Max Kern's great <a href="https://www.prusaprinters.org/prints/8412-zerobot-raspberry-pi-zero-fpv-robot">ZeroBot</a> robot (more on <a href="https://hackaday.io/project/25092-zerobot-raspberry-pi-zero-fpv-robot">Hackaday.io</a>), with the following changes:</p><ul><li>Headlights</li><li>Grooved tires</li><li>Charging port</li><li>Front panel holder.</li></ul><p>Also, thank you Kelly Jordan for the inspiration with your <a href="https://www.thingiverse.com/thing:2227184">aggressive tank tread</a>.</p><p>Some extra parts are needed:</p><ul><li>2 BC337 transistors</li><li>2 1.5K resistors</li><li>2 22Ω resistor (You may need to adjust this resistor's value, to provide enough current to drive your LEDs)</li><li>2 cheap flashlights (<a href="https://www.aliexpress.com/item/Mini-Pocket-Flashlights-Carabina-Keychain-LED-Torch-Lamp-Light-Flashlight-For-Outdoor-Camping-Hiking-Emergency-Survival/32813588277.html?spm=a2g0s.8937460.0.0.NhYiw6">like this one</a>), to source the LED and lens.</li><li>1 Kcd11-101 switch (<a href="https://www.aliexpress.com/wholesale?catId=0&initiative_id=SB_20170721084703&SearchText=Kcd11-101">easy to find</a>)</li><li>4 M3 x 12mm bolts</li><li>4 M3 nuts</li></ul><h5>Update</h5><p>Created a shrunk down raspbian image, ready to use, that may fit even a 2GB sdcard. (<a href="https://debug.net.br/ZeroBotOffroad.7z">download here</a>)<br>This image uses Max.K's latest Zerobot Pro control interface changes. To use it, just connect to the "zerobot" WiFi network using the password "zerobot1" then browse to this address: <a href="http://zerobot/">http://zerobot/</a> or <a href="http://10.0.0.1/">http://10.0.0.1/</a></p><h3> </h3><h3>Print Settings</h3><p><strong>Rafts: </strong>Doesn't Matter</p><p><strong>Supports: </strong>Yes</p><p><strong>Resolution: </strong>0.2mm</p><p><strong>Notes:</strong></p><p>First read the directions on <a href="https://www.thingiverse.com/thing:2352440">ZeroBot</a>'s page.</p><p>I'm using Slic3r (Prusa Edition) with this settings:</p><ul><li>Perimeters: 3</li><li>Solid Layers: 3</li><li>Infill: 20%</li><li>Overhang Threshhold: 16º</li></ul><p>If you need, use the extra brim files with the upper or lower shell for easier print (Slic3r):</p><ul><li>Add the upper or lower shell</li><li>Click Settings -> Load Part, and select the corresponding brim file.</li><li>Click OK</li></ul><p> </p><h3>Post-Printing</h3><p>First look at ZeroBot's <a href="https://hackaday.io/project/25092-zerobot-raspberry-pi-zero-fpv-robot">Hackaday.io</a> page, for the basic parts and instructions.</p><p><strong>Headlight assembly</strong></p><p>For this you need to retrieve the LED and lens from the flashlights.</p><p>You can adapt the headlight part to work with other flashlight sizes by altering some variables in the "CustomizationTable" spreadsheet inside the FreeCAD source file.</p><p>It's not possible to drive this LEDs directly from the raspberry pi GPIO ports, so you need to assemble this simple circuit:</p><figure class="image"><img src="https://media.prusaprinters.org/media/prints/95396/rich_content/876762e0-7c29-4c62-ba62-0a206d2d2318/headlight.png#%7B%22uuid%22%3A%22403e10ce-150b-4ca3-82cc-8300b7d718e2%22%2C%22w%22%3A1308%2C%22h%22%3A1347%7D"></figure><p>Start by gluing the 22Ω resistor and the transistor to the headlight part, then solder dead bug style like this:</p><figure class="image"><img src="https://media.prusaprinters.org/media/prints/95396/rich_content/f8379330-e296-460a-a859-0c90f21c5629/20170720_173106.jpg#%7B%22uuid%22%3A%227116b137-301f-4402-a4a3-e0a2b737130a%22%2C%22w%22%3A5312%2C%22h%22%3A2988%7D"></figure><p><strong>22Ω resistor and transistor glued to the headlight part.</strong></p><figure class="image"><img src="https://media.prusaprinters.org/media/prints/95396/rich_content/0aba70ea-153a-4421-a568-ca10ef16c40c/20170720_175418.jpg#%7B%22uuid%22%3A%225545d854-6fcb-45a4-b5b4-fbc08db35522%22%2C%22w%22%3A5312%2C%22h%22%3A2988%7D"></figure><p><strong>LED inserted and soldered (check LED orientation)</strong></p><figure class="image"><img src="https://media.prusaprinters.org/media/prints/95396/rich_content/9128f043-9fe4-4a69-a0dd-76879a2cada8/20170720_181035.jpg#%7B%22uuid%22%3A%2243691000-f713-4c8a-9916-3c5b67453291%22%2C%22w%22%3A5312%2C%22h%22%3A2988%7D"></figure><p><strong>1.5K resistor and cables soldered red=5v brown=GND blue=GPIO</strong></p><figure class="image"><img src="https://media.prusaprinters.org/media/prints/95396/rich_content/3eb49740-3dca-4752-92a8-a1405a07e0e3/20170720_181559.jpg#%7B%22uuid%22%3A%229a380f2d-3319-4ffd-8f6d-3424c3bd203e%22%2C%22w%22%3A5312%2C%22h%22%3A2988%7D"></figure><p><strong>Finish with heat-shrink tubing and some more glue</strong></p><p><strong>Software changes</strong></p><p>Replace the original app.js and Touch.html (~/Desktop/touchUI) with the files in touchUI.zip.</p><p>Optional: add the following line to /boot/config.txt to disable the camera LED.<br>disable_camera_led=1</p><p>Now you can turn the lights on and off by pressing the switch on the lower right corner:</p><figure class="image"><img src="https://media.prusaprinters.org/media/prints/95396/rich_content/65a95b33-d42a-4855-9e42-350987024e2e/touchui.png#%7B%22uuid%22%3A%22f0eca9f6-88e7-4c38-aad1-d3a27c12e652%22%2C%22w%22%3A650%2C%22h%22%3A540%7D"></figure><p><strong>On/Off Switch</strong></p><p>Just plug the switch, no glue needed.</p><p>Depending on your printer tolerances, you may need to adjust the hole size. You can do this by altering the "ON/OFF Switch Hole - Sketch" on the FreeCAD souce file:</p><figure class="image"><img src="https://media.prusaprinters.org/media/prints/95396/rich_content/b0571bb8-9bbf-4040-9978-77824ff87f32/switchhole.png#%7B%22uuid%22%3A%22403f3621-7b1d-4399-af26-eda0dc609c7f%22%2C%22w%22%3A623%2C%22h%22%3A481%7D"></figure><p>Category: Robotics</p>
With this file you will be able to print ZeroBot - "Off-Road" Version -- Raspberry Pi Zero FPV Robot with your 3D printer. Click on the button and save the file on your computer to work, edit or customize your design. You can also find more 3D designs for printers on ZeroBot - "Off-Road" Version -- Raspberry Pi Zero FPV Robot.