ZYR.N Sylph-3
thingiverse
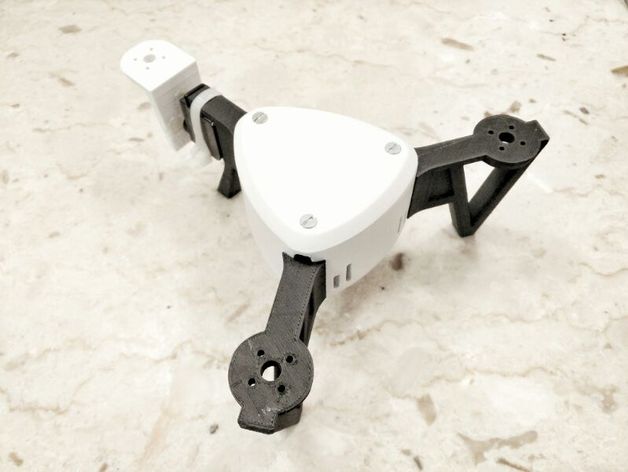
Work in progress, expect things to be added or changed I'm making a line of 3D printable drones of many different sizes and shapes. To start off, I'm releasing the Sylph-3, a modular tricopter frame made for small applications. Its arm-span is ~120mm from left motor to right motor, and ~130 from front motors to back motor. The current arms are designed to take DYS BX1306 motors, and a micro servo. There is a case for Line of Sight flying, and there will be one for FPV flying soon. Current parts list (unfinished): Flathead M3x40 machine screws / 6x Naze32 Mini / 1x DYS BX1306 / 1x CW 2x CCW OrangeRx 6ch Receiver / 1x SimonK 10 Amp ESC / 3x Micro Servo / 1x Zip-tie / 1x Print Settings Printer: RigidBot (with E3D mod) Rafts: No Supports: No Resolution: 0.2 or lower Infill: 20% or higher Notes: Recommend printing the arms with carbon fiber filament from Proto-Pasta. The casing can be whatever material you choose, as long as it is a rigid material (no ninjaflex or TPU). Print arms, tail, and case top upside down. Post-Printing Tail Arm Assembly a. Position the micro servo with the wire and shaft closes to the leg, then, route the wire into the diagonal slit. Put a zip tie over the slot on the top of the arm, then warp it under the servo, and fasten tightly. It should be tight enough that you can pull on the servo without it moving too much. b. Get the 4-point servo attachment and find the notch on the servo that makes it point directly horizontal and vertical when in the middle position, then, take it off and use hot glue or super glue to attach it to the tail piece. You may need to clean up the tail piece to make the attachment fit into place snugly. After the glue hardens/dries, press the tail piece onto the servo. Arm and Case Assembly a. Slide each of the arms into the respective slots of the case wall, with the flat end of the slot down, and the rounded end up. b. Align the case bottom with the screw holes of the case wall, then screw in the M3x40 screws until it's all the way in. This secures everything in place. c. Align the top plate with the screw holes of the 3 arms, then screw in the rest of the M3x40s. More steps coming soon
With this file you will be able to print ZYR.N Sylph-3 with your 3D printer. Click on the button and save the file on your computer to work, edit or customize your design. You can also find more 3D designs for printers on ZYR.N Sylph-3.