fnaf file size 3d models
1223725 3d models found related to fnaf file size.
prusaprinters
The part files are designed for M2x6 countersunk/flathead screws (as with all my other designs); 48 screws are required in total for the box. The parts can be scaled to use larger or smaller screws e.g. M3x8 screws at 150% scale.</p><p>There is...
prusaprinters
These are the files I used to make a ping-pong ball display! This is for somewhat advanced makers and assumes some knowledge to put everything together as well as access to tools. It attempts to simplify other designs out there for similar displays...
cgtrader
By providing accurate cad files of various exquisite pieces, our innovative tool saves precious time and enhances overall productivity. Engagement rings that radiate elegance and romance can be effortlessly created with precision. Whether it's a...
thingiverse
https://www.printables.com/model/331603-lcd-fan-controller-enclosure-for-prusa-box-printer/files If desired, you can add a different color to inside the button icons by adding a filament change 1mm below the "floor" of the icons and then another...
thingiverse
Use the imageJ rectangle tool (the rectangle icon roughly below the File menu), to select the part of the image you wish to analyze. You should select a horizontal range from the left extreme to the right extreme as pixel 0 is defined as the pixel...
thingiverse
More info in [CanAir.IO](https://canair.io) For our supporters, patrons or donors, we will send the files for our coming version: ## CanAirIO CO2 and CanAirIO Mini box 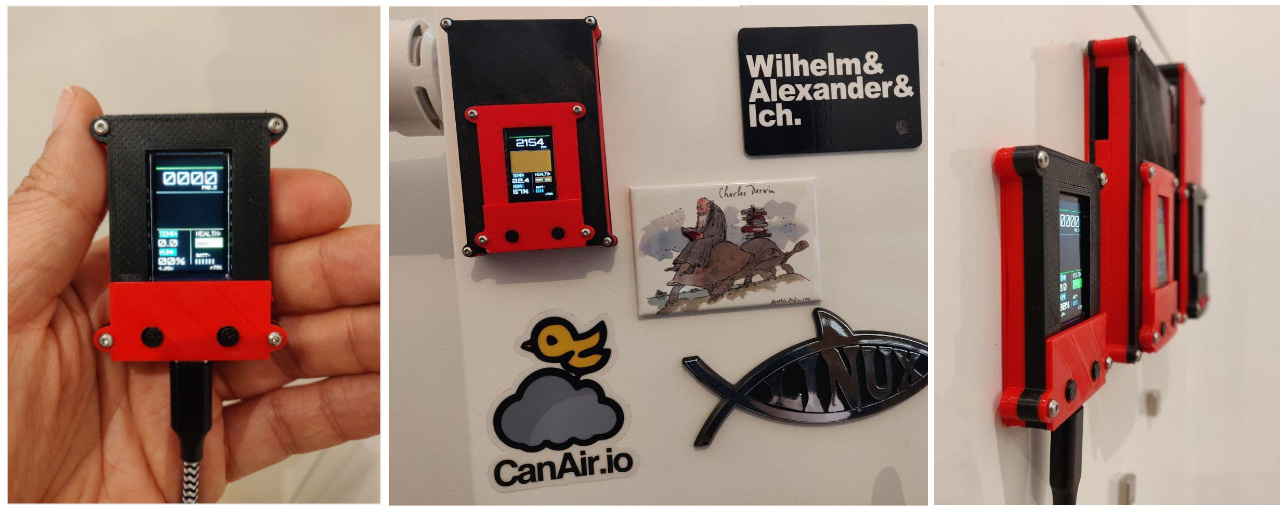...
prusaprinters
If installed in a vertical rail, it will slide down to the lowest point (unless used in a gravity free environment :) ).PRINT WITH SUPPORTS, they are minimal, easy to remove and necessary.There are 9 object files, as follows:1, 2, 3 & 4-lock options...
prusaprinters
Happy printing.PARTS NEEDED:1x Front Frame1x Large Slider1x Middle Frame - Top Half1x Middle Frame - Bottom Half1x Small Slider1x Back Frame - Left Half1x Back Frame - Right Half4x M3 Hex Nut4x Panhead Screw M3x85x Neodymium Magnet Ø 12mm, 2mm...
thingiverse
You will need to use a 2.5mm drill bit, rat-tail file, or acutely tipped blade to remove this single layer 'skin' from all of the M2.5 bolt penetrations. REQUIRES: 2x M3x6mm wedge-head bolt 2x M3 square nut 4x M2.5x20mm (whatever head) bolt 4x...
cgtrader
Polygons Body: vertices 47,128; polygons 47,126 Eyeballs: vertices 580; polygons 576 Pupils: vertices 740; polygons 752 Lacrimal caruncles: vertices 564; polygons 560 Upper teeth: vertices 6,388; polygons 6,364 Lower teeth: vertices 5,564; polygons...
prusaprinters
Fit the 9 pins inside the back piece and then solder them in with small amount of solder. ===Misc=== Full project file can be found on GitHub: https://github.com/jeffqchen/twindiamond ===Special Thanks=== Chris Kempson:...
myminifactory
(2.28m) Hardware: Raspberry Pi Zero W: https://www.adafruit.com/product/3400 Raspberry Pi Camera V2.1: https://www.adafruit.com/product/3099 Raspberry Pi Zero Camera Ribbon Cable: https://www.adafruit.com/product/3157 Micro SD Card 8GB:...
cults3d
52mm is my spool wide - if you got another wide, write a comment and I will upload another file (longer screw). :) Filling (screw): 25% Filling (plate): 10% Print height: 0.15mm (the thread needs to be detailed) PLA No supports needed Length screw...
thingiverse
*****************Build should be pretty self explanatory, as there are not many parts, but I will provide a write up as follows***************** I recommend Printing 'TEST ME' file first, to ensure this will work with your wheel. If you can print...
prusaprinters
To reduce filament weight, there is a 3mf file provided with 10% lightning infill and an additional modifier in the middle top region to support the upper part of the pumpkin. The model was printed with a 0.6 nozzle to fasten up the...
thingiverse
I used printed couplings from [wsvenny on cults3d](https://cults3d.com/de/modell-3d/spiel/n-scale-piko-coupler-and-knuckler-piko-reduction) and old PIKO wheel sets (sanded and polished) use good wheel sets ----- ### Updates 2022-10-17 changed hints...
thingiverse
The motor mount for Y has been imprinted (no need to cut the plastic of the original leg, overlap but you need to expand the window for the belt a few mm to the left and right with a file) but you need to drill 3 holes. I drilled with a 2.5mm drill...
cults3d
However I will not sell the model file or use it as an NFT. I will never stop you from printing this model on your own 3D printer for any reason. As an irrelevant aside, I hate NFTs. I'm fine with you putting it in your games and asset packs, as well...
thingiverse
... becoming a Patron! https://www.patreon.com/rkxdesigns Becoming a patron gets you early access to files and opportunities to get involved with the creative process. Early STLs, images of works in progress, and voting for upcoming designs! ...
thingiverse
I just hope one day, maybe, someone can perfect this model so it can be printed from PETG since that would be more than strong enough!I've attached the original STL that I ended up using, only uses 6x bolts that go directly to the linear rails and...
cults3d
I then remixed his conversion to fix it and give the people who asked for him to make his conversion of my original DAE to the much better version that better version), and I put the files in the original (it's a long story). But in the long run, I...
prusaprinters
Use a metal file to round off any sharp edges to make it slide in easier.Cut the LED strip at the designated cutting areas to fit the u-channel.For 24V MK3 builds, cut the red and black wire to 90cm (36"). For 12V MK2 builds, cut it 120cm (48") as...
thingiverse
The files for these include a larger "top" diffuser and a small "bottom" diffuser, to be arranged as shown in the photos above. Each diffuser fits over the threaded base and is secured by tightening down the nut. If you desire more diffusion you can...
thingiverse
_2023-03-08 Edit_: The `player_parts_box.stl` was rather tight on the cubes due to a miscalculation in my OpenSCAD file. I've adjusted that and this new box should allow for a better fit of the cubes. Model specific notes follow: ...
myminifactory
It is included in the files after optimization. PL Pojemnik wydrukowany i sklejany. Konieczne 4 magnesy średnicy 8 mm i grubości 3 mm. Konieczna oś stalowa o średnicy 3 mm i długości 40 mm. Może być do 2 mm dłuższa. Zalecam użycie kleju PATTEX –...
prusaprinters
In addition, a thin washer if the connection becomes too loose over time.----------------------------------------------------------------This is another spool holder for the Creality Ender 3 (Pro) - and my first "creation".I created it to be...
thingiverse
As the design stands after all the tweaks made to this print file - once you finally have it together correctly the internal structure of diaphragm does produce just right sounds, if however; your air passage isn't as expected. It would help make...
prusaprinters
... and/or leave a comment and let's make your perfect version. I only ask that you post a make!If you'd like the CAD or STEP file too, no problem. I've already helped a bunch of great folks! ...Send me a ping</p>
prusaprinters
And maybe they will wear them to school the next day and tell the other kids about how they 3d printed them with their dad.+++++++++++++Build Tips:Standard bobby pins are approximately 2 inches long (51 mm) so please be sure to check the dimensions...
prusaprinters
Each prints in the orientation shown in its STL file. There is a minor span in the body at the opening for the USB connector, but both parts print easily without supports. The body doesn't need more than 25% infill, but it doesn't hurt to make the...