tailgate latch 3d models
13375 3d models found related to tailgate latch.
prusaprinters
Align top frame width from the 200x400 sheet slots if needed.Mark screw locations on the top frame, drill and install screws (M3x16)Add metal rod pieces to the hinge between top frame and front sheetGlue magnets to 28 SL1S enclosure front bottom mid...
prusaprinters
I also added a 12.7mm hole to put in a latch button for an on and off switch. I also changed the mount a little as I ruined my MAX7219 module trying to screw it into the original mount (totally my fault). This modification allows you to just set the...
thingiverse
Post Assembly Ideas: I would consider using latches similar to the front door on one or both of the side panels. It would make entry to the side/back of the enclosure a little easier. I would also consider adding a handle (or handles) to the top of...
prusaprinters
One deck and Two deck boxes of the same size will stack. The latch is intended to just help keep the box shut with normal handling. It won't keep the lid on if you attempt to shake it open by the bottom with the lid pointing down. If you need that...
cults3d
A canopy that can be opened and closed easily with a latch system and a large inner space of the fuselage are easy to work with. Basically, this aircraft is a sailplane, So, it is not suitable for extreme aerobatics or high speed. You can enjoy a...
thingiverse
*Candy cup* Print this part flat side down, with the latches facing up. No support necessary here either. *Barrel cap* Print either side down for this one. No support needed. *Pirate crest* Print it flat side down in your highest detail setting....
prusaprinters
Push the latch into the window on the clamp until its flush with the surrounding surface. -> VII. Slide the lightbulbs into the rail on the clamp.<br/> -> VIII. Slide the pummel onto the heatsink and turn it clockwise until you hear a...
prusaprinters
The Bed latch then screws down to hold that in place. The zip tie holds the bed end cable ends in place. You will need to disconnect the control box ends of the heated bed power cable and temperature sensor to be able to route the cable. ...I left a...
thingiverse
FAQ: http://www.thingiverse.com/shivinteger/about [>>>] Generating Attributions log: [0] Thing Title : 3D Printed Sunglasses [0] Thing URL : http://www.thingiverse.com/thing:18192 [0] Thing Author : jonducrou [0] Thing Licence : Creative Commons -...
thingiverse
Caution, once you connect everything be careful not to short anything.\nSecure R-Pi in case with some tiny screws, I got mine from old equipment and devices, no need to buy any if there is junk laying around\nSecure batteries with hot glue tabs,...
cults3d
W x H x L = 53mm x 23mm x 53mm 4 x 18650 LiPo batteries (recycled or new, just make sure at full charge they are close in voltages) 1 x 2S BMS 7.4/8.4v...
cults3d
Optional for safety, you can wire and use a push button to activate a relay that self latches to hold power to run everything. after buzzer ends it will release the relay. this is NOT in the Code Yet. Parts Used: This list is just a list. I get...
myminifactory
Hides bumper mount screws) Custom number plate Bumper mount (there are 6 different bumper mounts included) Accessories: Cab side handles (3 types of handles available to mount to the side of the cab) Air filter (Can be fitted with the included...
myminifactory
Hides bumper mount screws) Custom number plate Bumper mount (there are 6 different bumper mounts included) Accessories: Cab side handles (3 types of handles available to mount to the side of the cab) Air filter (Can be fitted with the included...
prusaprinters
Otherwise set it to 1 for printing.Print SettingsPrinter: Prusa I3 MK3SSupports: NoResolution: 0.20 mm layersInfill: 20% cubicFilament: Any non-flexible Notes:You can print this with no top and bottom surfaces to speed up print time although the...
cults3d
The box has 2 latches to ensure that it does not open during transport or handling. I have also added foam pads so that the items inside will not be damaged if they receive any knocks. *The MX master 2 also fits in the box, however it does not fit...
prusaprinters
The holes for the banana plugs and the iron holder are not included in the file, but they can be easily drilled after the print is done. I have not taken photos of the inside cause it is pretty crowded with wires but if anyone is interested i can...
thingiverse
A zip tie notch is also provided for the power supply electrical cord to keep it in place.To attach the Meraki device you simply move the locking levers to their outside position, hold the Meraki device up to the plate so that the "+" latches engage...
thingiverse
... material joining the two. Much "Beefier" now! - **06/07/2017** Recommend change to rear leg bases print orientation. This is due to the latches weakness and breaking where it meet the base structure since the strength only came from the layers.
thingiverse
https://www.youtube.com/watch?v=5PCFBKIXGjU&feature=youtu.be PARTS LIST: 1 - 80mm M4 Bolt 3 - 40mm M4 Bolts 6 - M4 Nuts 9 - M3 Nuts 5 - 12mm M3 Bolts 1 - 30mm M3 Bolt 3 - 15mm M3 Bolts UPDATE: I fixed the filter latch from preventing filters from...
thingiverse
The case latch will be fairly tight at first but will loosen up to a more normal open/close operation after some use. Please post your makes. EnjoyThis is an easy-to-print design that doesn't require supports when printing, but due to its tight...
thingiverse
The mounting system latches into position, ensuring stability during gameplay. To utilize the hot swap capabilities, simply add cable connectors to your wiring, such as DB15. This feature is ideal for maximizing space by allowing you to swap out...
prusaprinters
The SpoolSide is a Latch for holding the unit to the wall. Print one each. Pay attention to how high you mount the buffer as the feeder tubes might touch a tall print. I shortened the tubes to the MMU to 40cm (16 inches) and mounted the buffer...
thingiverse
**Before** 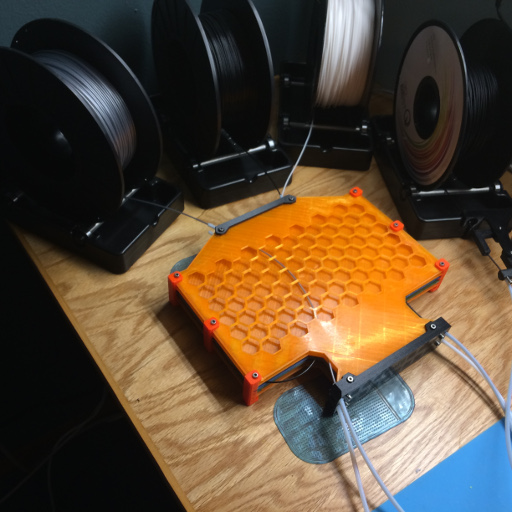 **After** 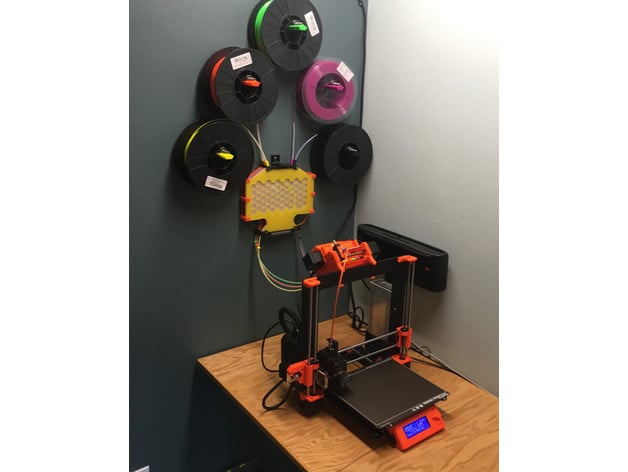 I...
thingiverse
### Assembly notes See youtube clip here: [Assembly and disassembly instructions](https://youtu.be/TMC4TadyGks) The tabs goes into the hole(s) and is then pressed down to latch onto the pegboard. I have designed a lock to put into the space above...
thingiverse
There Is a Print-in-Place Sliding Latch on the Replacement Back, This May Not Come Out Properly If Your Printer Is Not Super Accurate. This Should Not Be a Problem as the Print Fits Very Snugly and Should Stay Attached Just by Friction Fit Even If...
prusaprinters
Test print one standard corner brick first to see if the default clearance will work for you.Brick_Corner.stl x 8Brick_Side.stl x 4End_Brick_Corner_Left.stl x 3End_Brick_Corner_Right.stl x 3End_Brick_Side.stl x 4End_Brick_Center.stl x...
thingiverse
... Bosch quick release, or use the long cam and pins included above. Cam - https://www.thingiverse.com/download:3726841 Pins - https://www.thingiverse.com/download:3726842 (or use 1/4" x 3" bolts) Latch 2x https://www.thingiverse.com/download:3359194
prusaprinters
Position the pizza piece upwards to allow clearance of the phone holder to latch onto the ring connector. On hindsight this might seem flimsy, so glue away if desired.</p><p>This means the pizza piece won't rotate out of the ring connector if the...
thingiverse
Top cover should securely latch with friction to the base. If it doesn't, please check your settings and make sure you dont have anything manually set that changes the models dimensions (layer width, etc). Once you have a base and a top printed...