biltong slicer 3d models
51844 3d models found related to biltong slicer.
prusaprinters
Just switch on "Supports" in Cura or whichever slicer you have. I like Cura's tree supports! They are easier to remove!</p><p>Just as with the Prusa design, most of the printed parts are organized into sheets of multiple parts that are all designed...
prusaprinters
UHU Allzweckkleber)Tools: 1x cardboard cutter 1x straight cutting guide 1x hexagon spanner 1x 8mm wood drill + portable electric drillSteps of Assembly: 1) Print parts: 4x...
thingiverse
You will have to orient everything to lie flat in your slicer. The cable chain mount should be printed with the link tabs up top. You will need to print 17 links/closures, and one each of the others. You’ll need internal supports for the slot...
prusaprinters
(Unless you need miscommunication for a plot point).Fuel takes very little space.No one ever goes to the bathroom.In this space-faring RV, we have fancy clear panels instead of the little riveted portholes often seen in this style.I recommend you...
prusaprinters
No supports, no raft and using Stock .6 Nozzle settings on Prusa Slicer. The only files you need to print is the Main body and Turntable, everything else is included for ether reference so you can design your own using these style lamps or to check...
prusaprinters
See new_button.stl and new_button.step if interested.I flipped “Lid v7.stl” upside down in the slicer before printing so the wider side is on the bedplate. The fitment of the display holder to the lid and the lid to the case are good and didn't need...
thingiverse
 ##TLDR Instructions todo: 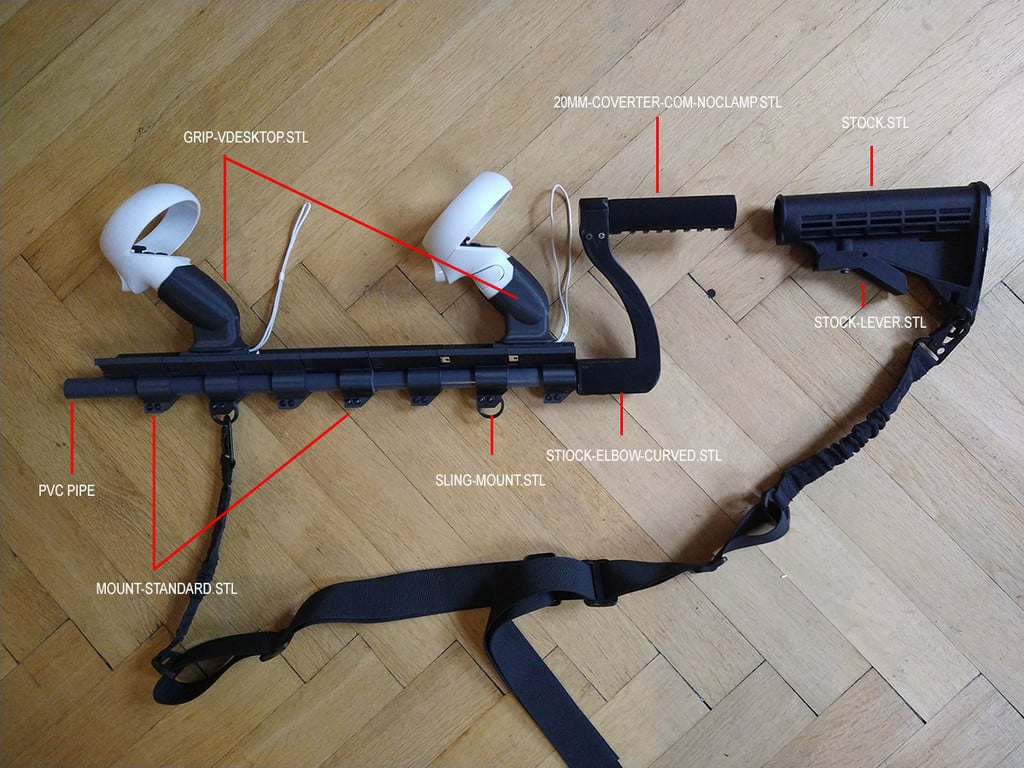 The following...
prusaprinters
If you consider this a problem, try to scale down the lamp base by 1-3% in X and Y directions (you can easily do this in the slicer). If you still have problems, then please visit the original thingieverse publication (<a...
thingiverse
it'll save your battery and your LCD. Step 9: Print the MountPrint with TPU filament, slowlyUse tree support if your slicer supports itBest printed on its side (as oriented in the STL).Use 2 perimeter walls for most setups. 3 walls for bando...
prusaprinters
Updated battery tray (Unprinted) Radiator in front doesn't look great from my slicer, need comments on how to improve. maybe just reduce detail. I print at .3.. on this. Added Battery Lid (Unprinted) Not as easy to print as I would like and no mount...
thingiverse
#### Test your entered measurements The accuracy of the entered values not only depend on the measurement itself, but also on the used filament, your slicer settings and the printer setup. Therefore, Amiga Clock provides test parts, which you can...
thingiverse
Make appropriate adjustments in the printer firmware and slicer as needed for the change to direct drive. The new assembly will be heavier with the extruder on the gantry. Acceleration and speeds should be de-rated to compensate. ...
cults3d
But it turns out it this isn't problem, I added supports in the slicer and it printed great. A down-scale to around 16.75% is a good fit. Also, I used a 0.2mm nozzle for the Pod so as to preserve as much detail as possible. EVA Pod Model...
prusaprinters
Currently the space symbol on board part 1 has too small of "sun beams" so the detail likely won't come out in your slicer. I will fix that later.</p> <p>--4-27-17--</p> <p>Thank you Mike1840858 for the idea (that I'm totally stealing). I increased...
cults3d
Note on the Arrows: Ive had the best results with a bit of slicer manipulation: I added a modifier to the tip of the arrows such that the tips are printed at 100% density while the shafts are printed at 20%. This will help balance the arrows in...
prusaprinters
(On completion of final checks this note will be deleted!)28 April - Added BOTTOM-BRACE_125 to the Printed parts schedule.DIMENSIONSTop - 280 x 370mmFrame - 340 x 260 x 400mm high (13.5 x 10.5 x 19 inches)TOOLS REQUIRED3D PrinterSaw (if required to...
prusaprinters
Mine are 25mm, for example, the Cross Country Performance kit uses 30mm thick spacers so you could modify the height in the Z-Axis in your slicer to potentially get 2.5" of lift from the tophat spacers alone. The lift given by the thickness of the...
cults3d
4 different configurations exist across 2 files: mirror in your slicer as desired. There are 6 rubber feet on the bottom to allow air to flow up and in through the vent holes in the bottom of the front under the LCD display. The 2 halves of the box...
thingiverse
G-CODE AMMENDMENT: You need to ammend the following G-Code scripts to the very end of the "End G-Code" of your printer settings in CURA (or in an other Slicer): ;**OPTIONAL AUTO POWER OFF SCRIPT*** M109 R40 ;Wait until hotend temprature is down to...
prusaprinters
Fire retardant filament is NOT necessaryALL Parts are printed without any supports!Perimeters: 4, solid layers: 5 for both top and bottom, Infill: 40%All STL's already have correct orientation for print, just import in the slicer of...
prusaprinters
112mm of 2mm-diameter metall rod (I used welding filament)10x M5 nut (it's additional mass for the balance wheel)a pair of sidecuttersa hard surface to press against OR a vise to push the rods in the printed partsa drill with a drill chuck (if you...
thingiverse
This may vary with your slicer settings.GameBoy / GameBoy ColorThe "gbgbc-normal" variant can hold grey, black and clear GameBoy / GameBoy Color carts with standard form factors. Holds 10 games. Incompatible with Rumble carts or Camera. Compatible...
prusaprinters
Then just flip this over in the slicerThe text options are a okay for basic text, but if you want to use another program to add some, you can add extra height to the top/bottom of the card under Extra Size Setting Add an iconYou can import...
prusaprinters
The slicer will need to add support scaffolding, but it comes off easily and does not leave visible traces. My friend used arbitrary settings which worked OK, but he thought maybe Vase Mode would do a cleaner job next time, so that's what I'd suggest...
prusaprinters
There are some folks that use Lego or Duplo for project management, although this doesn't seem to be very well documented. ### Printing Slicer settings: First layer must be real slow: 12 mm/s 0.25 layers or less for better quality Ideally, you...
prusaprinters
Then again, another solution to the tightness would be to scale one of the parts by 1-3% in X and Y direction (you can easily do this in the slicer). The eight lamp shades should be printed with a certain set of colours in order to give a correct...
prusaprinters
I have included a Prusa Slicer (v2.4) project with my suggested orientations and supports already defined for those parts that need them. The parts are grouped by colour, so black, silver and brown.</p><p>With a few exceptions.<br>The...
thingiverse
The walls of the cup holder “surface” are 1.6mm, with the intent that a 0.4mm nozzle will yield no “infill volume” if you use the typical 2 walls in your slicer settings (2 inside walls + 2 outside walls = 4 total wall width = 1.6mm) a. Note: My...
thingiverse
Before starting, set the printer and the resin in the slicer according to the manufacturer's guide values. Informationen, Hilfe und Lösungsansätze zum Siraya-Test: Information, help and solution for Siraya-matrix: ...
prusaprinters
Do not use slicer's brim setting as you need the latches where the housing parts connect quite clean. Numbers For ease of printing, I've created the numbers as a single body. I merged them altogether with a thin plane of 0.0001 mm, hence it will not...