nerf sledgefire mega shell 3d models
65076 3d models found related to nerf sledgefire mega shell.
thingiverse
Print with nut insert" /> Electronics Tools • Accessories Hand Tools Power Tools • Accessories <a href="https://www.thingiverse.com/thing:3837220" title="Grinder....
thingiverse
Also compatible with Action Replay and Mega Memory. GameGenie NOT compatible. Max height of carts is 118mm.Outer size (WxHxL) : 72,3 x 120 x 125mmMaterial : Box 140g / 46,9m - Drawer 63g / 20,8mGameBoy AdvanceThe "gba-normal" variant is compatible...
myminifactory
If you plan to buy these 3 publications, ask me for a discount and I will create it for you if you can't wait until I publish a "mega-combo pack" with these 3 publications. Of course, you will need to add copper tape to each track part. Please look...
prusaprinters
I also think they look cool. Electronics: I'm using an Arduino Mega & RAMPS 1.4 board for my main controller, this of course only allows 2 extruders, so I am also using Printrbot's Extrudrboard for the extra 2 extruders. This is connected to the...
cults3d
If you plan to buy these 3 publications, ask me for a discount and I will create it for you if you can't wait until I publish a "mega-combo pack" with these 3 publications. Of course, you will need to add copper tape to each track part. Please look...
cults3d
As an example a RAMPS with Arduino MEGA 2560 runs at 16 MHZ. This limits the step generation to about 10MHZ before the CPU gets bogged down and begins to miss steps, this is with a single stepper too, divide that across 4 and you can quickly run...
thingiverse
- This is my first mega type build of this degree. It's not going to be perfect. And it's all designed in tinkercad. And I have now rebuilt almost all of the original to increase details, and improve the print quality. a few times over now :P - By...
prusaprinters
Print Settings Printer Brand: Anycubic Printer: All-metal Mega Rafts: No Supports: Yes Resolution: 0.1 Infill: 25% Filament: Filamentum PLA Mixed Notes: Parts requiring supports: base, hoodie, head, hand and hair. Most parts print without any...
thingiverse
... To do: This is an ongoing project. I'm really satisfied with the result, but you never know ;) For full resolution photos, you can download the following zip file: https://mega.nz/file/UBxVXaSC#XK9ezGLZhy4c5EhDmJi8cDcXQSQUy4b-u5ytCk0GgpM
cults3d
This time, the interdimensional police force has its hands full in an asymmetrical battle with the nefarious Zero Syndicate for control of a bustling mega-city. Stay tuned for more sets and pieces, as well as updated rules for all of the previous...
cults3d
... This is the Arduino MEGA 2560 board. To mount your RAMPS to it just align the pins and gently push them together. #Now let's take a look at the RAMPS 1.4 Here in this poorly lit up-side-down picture is the colorful board I choose for my $12.
prusaprinters
There is an additional 25° angled adapter provided in the downloads.Please browse my other things to find proper adaptors for suction hoses.Print instructionsPrinter Brand: AnycubicPrinter: All-metal MegaRafts: optionalSupports: NoResolution:...
cults3d
As an example a RAMPS with Arduino MEGA 2560 runs at 16 MHZ. This limits the step generation to about 10MHZ before the CPU gets bogged down and begins to miss steps, this is with a single stepper too, divide that across 4 and you can quickly run...
cults3d
Parts 2 - Closet door hardware 1 - Boroscope camera (https://www.amazon.com/dp/B071HYRPND/ref=cm_sw_r_apan_glt_fabc_N0M3MJPRH2NBZRRFNEY8?_encoding=UTF8&psc=1) 2 - Soil moisture sensor...
thingiverse
[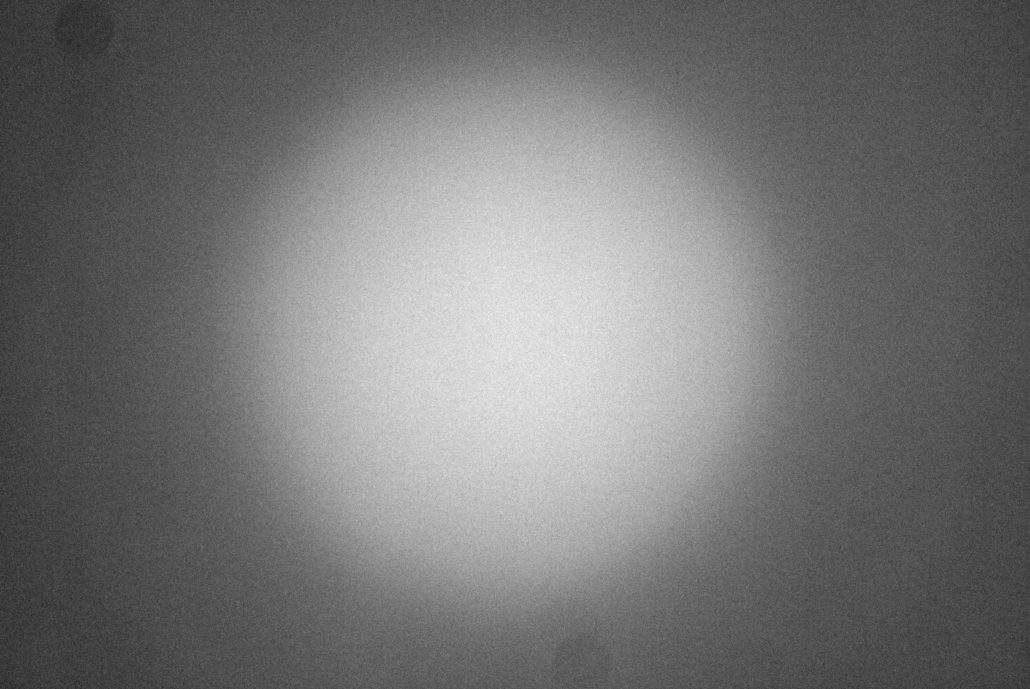](https://www.sternwarte-hoefingen.de/wp-content/uploads/2022/01/2021-10-09-flatfield-vignette.jpg)Beispiel Vignettierung unserer...
prusaprinters
This is the version i would recommend downloading and using. Note 19/9/18 Two things i forgot to mention. Extruder direction will be reversed when you use this so you will need to either change it in firmware or at the connector. Extruder ESteps...
prusaprinters
Amazon link. Print settings:StandUsing the original post's settings works fine:Infill: 30 % cubicShell: 3 perimeters for good stabilityLayer: 0,15 mmSupports: no MoonUsing the original post's settings:Infill: 100 % or solid 4-5 perimetersLayer: 0,2...
thingiverse
There are still some warp issues that are unavoidable, which should be handled by the screw points that hold the cover shells together. --Added lots more cable management. --Added a side cover to support two buck converters with easy access to...
prusaprinters
I used at least 3 shell perimeter layers in the hope of better rigidity. </li> <li>Used PLA, but as mentioned in the comments, PETG is probably a better choice for the gears.</li> <li>Print 3x '19-screwFront01'</li> <li>Print 6x '22-screwBack01'</li>...
prusaprinters
(You can try printing them separately from the shell and inserting them manually, but I don't recommend it.)Required parts for the vent attachment:1x Keen Vent Attachment1x normally-closed (NC) reed switch and magnet per ventThin (1/32") conductive...
prusaprinters
...Will update as result unfold! Print InstructionsIf you don't use my 3mf or gcode files for the spouted rings, make sure you turn off the Advanced setting for “Ensure vertical shell thickness” under Printer Settings → Layers and perimeters → Quality.
pinshape
I recommend printing all parts with at least two shells and 25% infill. No supports are needed to print anything. It's still a work in progress, getting it to work correctly requires finding the right tension balance between the elastics that pull...
prusaprinters
Simply apply pressure and roll the cube back and forth until the knot is flatter.PrintingNozzle: 0.4 mmLayer Height: 0.2 mmInfill: 25%Vertical Shells: 3Top/Bottom Layers: 5Supports: NoYou'll need one bead and two caps.For the caps, try the TightCap...
prusaprinters
I also used a GeckoTek plate to ensure perfect adhesion of the parts to the bed. Fred is in proportion to my other Flintsone models. If you have the proper filament colors, no painting is required. The model is 29cm tall. Enjoy, and I hope you have a...
prusaprinters
this is designed to fit underneath hopefully any Hornby 0-4-0 shell. as part of this, I've included a back piece, and two front's with and without cylinders. there are also two versions of each piece, one for Percy wheels (15mm Dia) and for Duck...
prusaprinters
i found that the carrier wobbling a little bit. i've try with 608 bearing, but metal on metal is too noisy for me. So instead of paid 80€ for proper delrin rollers. I've try to made my own with a bunch of MR83-ZZ bearings. theses rollers can be...
cults3d
... the lids in their open position. Align the lowest gear tooth with the bottom gear teeth of the cart Place the entire lid and cart combo into the main shell. ...It should click into place (and that's why having an accurate printer is a requirement).
thingiverse
solid wireBreadboard solid wire jumpersM2 X 4 mm X 3.5 mm brass threaded inserts (4 req'd)https://www.amazon.com/gp/product/B07VBRF7P2/M2 X 12 mm round, Allen or pan head machine screw (cover, 4 req'd)M2 flat washers (cover, 4 req'd)M2 X 6 mm round...
prusaprinters
Print Settings Printer: D-Bot Rafts: No Supports: No Resolution: 0.12 - 0.2 layers, 0.4 nozzle, 5 shells Infill: 10-25% Cubic Notes: Print at 0.2 layer height for the bridge layers to show up properly. Fan shroud printed at 0.12 but would probably...
thingiverse
This mask shell was built as my Mark II design but it also serves as the main piece of my Mark IV and Mark V mask designs. For the Mark II, I print it out and thermo-form it. I use adhesive-backed craft foam to make a simple gasket. I use some...