removable spool piece 3d models
500546 3d models found related to removable spool piece.
thingiverse
**Mirror Prints** - two mirrored parts at the same time, again doubling throughput **Standard single filament prints** - by X or U individually [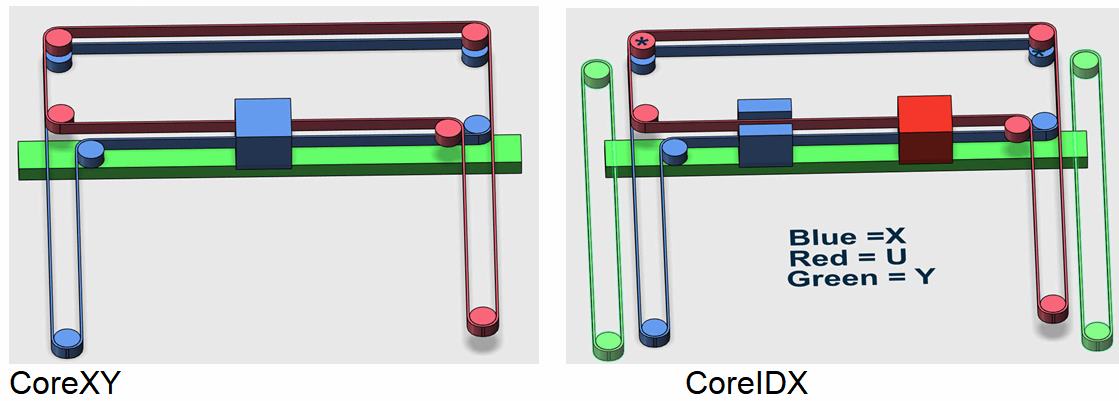](https://postimg.cc/hzfZQd8h) The...
thingiverse
* Remove the 4020 duct, BMG and hotend, if installed. * Sandwich the extruder plate between the extruder stepper and the BMG, and start the three long M3 screws. Do not tighten fully just yet. * (Dragon HF only) Rotate the hotend so that the heat...
cults3d
It has been written for ABL but if you don't use ABL then just remove the G29. Two versions of the start code are shown below. The first version uses Lin Advance on E0 but no Lin Adv for E1. The second version uses no Lin Adv at all. ; Ender 5...
prusaprinters
Or just remove the terminals and solder everything. That's the most secure. I will most likely do that on the next one.</p><ul><li>Apparently if you screw terminals too hard, the solder joint can shear and cause a bad connection. Happened to me. The...
prusaprinters
It is possible (but fiddly) to remove it again with a small screwdriver.If, like me, you don't know anything about knots, this worked well https://www.animatedknots.com/gnat-hitch-knot Final BitsTie the ring onto the end of the left cord and the...
thingiverse
Removed the old file and uploaded the new one (REV7 steering link clearance fixed.stl). - New slightly modified rear chassis plate added. No need to switch from previous design. This newest version just adds a little bit more space to the rear...
prusaprinters
I updated the .ino file to use the beeper.(Update):Replaced the file FrameSpacer.stl with new version that adds some clearance between the belt and this part by removing material from the 3 screw guides at the curved end.(Update):Uploaded schematic...
prusaprinters
The smoother the interior is, the better. Use sandpaper, a utility knife, or a flash-cutter to put a very slight chamfer on the upper and lower edges of the crescent-shaped locking rib of the hot end lock. Assembly notes: The one tricky thing is...
thingiverse
Here's how you can convert this format into numpy arrays of x, y, z: ```python import numpy as np hull_data = [[...your data...]] x, y, z = [np.array(item) for item in zip(*[data[i] for i in range(len(data))])] # Remove points that don't connect...
prusaprinters
The slot should allow a bit of vertical adjustment.Install the probe mount to the extruder plate using two short M3 screws.Remove the 4020 duct, BMG and hotend, if installed.Sandwich the extruder plate between the extruder stepper and the BMG, and...
prusaprinters
(Support on the build plate only.)Scale's easily if you want a larger or smaller version.Currently set at 75% size to reduce build time. Enjoy!~~~~~~~~~~~~~~~~~~~~~~~~~~~~~~~~~~~~~~~~~~~~~~~~~~~~~~~~~~~~~~~~~~~~~~~~~~~~~~~~~~~~~~~~~~~~~~~~~More fun...
cults3d
Check your horizontal expansion to ensure your pieces will fit properly (tutorial): https://www.thingiverse.com/thing:1662342 This 3D model has not been approved by any regulatory agency and has not passed any laboratory tests. It is a prototype...
prusaprinters
(Support on the build plate only.)Scale's easily if you want a larger or smaller version.Currently set at 75% size to reduce build time. Enjoy!~~~~~~~~~~~~~~~~~~~~~~~~~~~~~~~~~~~~~~~~~~~~~~~~~~~~~~~~~~~~~~~~~~~~~~~~~~~~~~~~~~~~~~~~~~~~~~~~~More fun...
prusaprinters
Instructions will be included how to create your own custom ear designs since that piece was missing from every other similar "Mickey Ear" concept I've seen.There were at least 2 examples of this project elsewhere on Thingiverse and the great wide...
prusaprinters
All pieces would be oriented correctly to print without supports. The total height is approximately 2.30 meters. The model is made up of 3 parts: STAGE 1 STAGE 2 FAIRING Print instructionsUPDATE December 19, 2020: Complete version of the falcon 9...
prusaprinters
The mechanical assembly is not so complicated.I don't have an assembly tutorial for this project now, but I've put some pictures of the robot disassembled to help understand how it's built.If you have any questions about the project or the assembly...
prusaprinters
Español: El diseño de esta pieza está pensado para poder fijarse a un tubo horizontal del respaldo de la silla de ruedas, de tal manera que permita transportar una maleta que no sea de grandes dimensiones. Este diseño mejora el anterior (...
prusaprinters
I printed them at 20mm (4 hours or so,) but they look even better at 15mm.Enjoy!~~~~~~~~~~~~~~~~~~~~~~~~~~~~~~~~~~~~~~~~~~~~~~~~~~~~~~~~~~~~~~~~~~~~~~~~~~~~~~~~~~~~~~~~~~~~~~~~~More fun stuff:Construction:Building under construction Part 1 -...
prusaprinters
I paid about $1 a piece for all the ball bearings on eBay or Amazon.Some of the “2mm” and “3mm” shafts that I’ve picked up on eBay or Amazon have been slightly oversized, just enough so the bearings won’t fit on to them. Look for a slip fit of the...
prusaprinters
(Support on the build plate only.)Scale's easily if you want a larger or smaller version. Enjoy!~~~~~~~~~~~~~~~~~~~~~~~~~~~~~~~~~~~~~~~~~~~~~~~~~~~~~~~~~~~~~~~~~~~~~~~~~~~~~~~~~~~~~~~~~~~~~~~~~More fun stuff:Construction:Building under construction...
cults3d
Please let me know if you want to split it into more pieces for smaller 3D Printer. The STL is for personal use only. ...Do not copy or redistribute work (please contact me if you want to use it for Commercial Purposes ) __ ...
cults3d
Please let me know if you want to split it into more pieces for smaller 3D Printer. The STL is for personal use only. Do not copy or redistribute work (please contact me if you want to use it for Commercial Purposes ) If you have any questions or...
prusaprinters
ENGFull article: https://blog.prusaprinters.org/how-to-print-for-animals_46054/Assembly and recommendations:All boxes are easy to assemble: simply use a piece of filament for hinges and M3 screws or wires for attaching to a solid...
prusaprinters
for the feeler and fillet gauges i simply threaded a piece of string through the holes in the prints and tied a loop in the string so i can hang them over the workbench. leave enough slack in the line so that you can easily separate one of the tools...
prusaprinters
The model should fit in a 15cm x 15cm x 20cm box with similar complexity like the following images:Parts List: 3D Printing :Aeo_2.0_TopUmbrella.3MF*1Aeo_2.0_BottomUmbrella.3MF *1Aeo_2.0_Person.3MF *1Aeo-2.0_Lightning...
cults3d
This model can be scaled or expanded according to your needs Please let me know if you want to split it into more pieces. If you have any questions or problems with the model, please feel free to contact me via my personal...
cgtrader
Even though there is more going into what each piece needs - let it just remain your business and not be something you ever worry about when all you have to do is race around as much as desired - this time of the day brings with itself what we've all...
cults3d
once I do the frame today, I will make a cad file of it in PDF and DWG and STL in one piece so that maybe someone with a laser cutter machine big enough can cut it automatically. also when the frame is done i will assemble it and begin to take...
prusaprinters
(Support on the build plate only.)Scale's easily if you want a larger or smaller version. Enjoy!~~~~~~~~~~~~~~~~~~~~~~~~~~~~~~~~~~~~~~~~~~~~~~~~~~~~~~~~~~~~~~~~~~~~~~~~~~~~~~~~~~~~~~~~~~~~~~~~~More fun stuff:Construction:Building under construction...
thingiverse
Using the guide and tools in the first photo I was able to cut the board shown into two equal-sized pieces with an accuracy of better than 0.01 mm (the resolution limit of my calipers). # Usage tips Mark one corner of your circuit board with...