line cad 3d models
220421 3d models found related to line cad.
prusaprinters
Even on objects that may be taken for granted, the community can discover the best possible form and bring beauty to them through meticulous attention.I really enjoy doing well organized CAD, and this was a very fun weekend project. I’d love to see...
thingiverse
You can adjust these to your needs in your favorite cad software. Finally, I know this is a long read, but I tried to provide as much details as possible. In my experience, when looking at others' designs and trying to reuse/modify them, I felt...
prusaprinters
The outside surface will be sanded anyway, so don't worry about those so much. Sand all the outside surfaces ALONG the wood grain lines (horizontally), using 80 grit sandpaper. Take care not to sand across the grain (vertically). This removes...
thingiverse
For this I designed a new case with CAD, that fits to the back case of the LX200 and in which the LX200 main board and the new keyboard fit perfectly. Please note that in order to make the part more robust, the small tubes that connect the front to...
thingiverse
[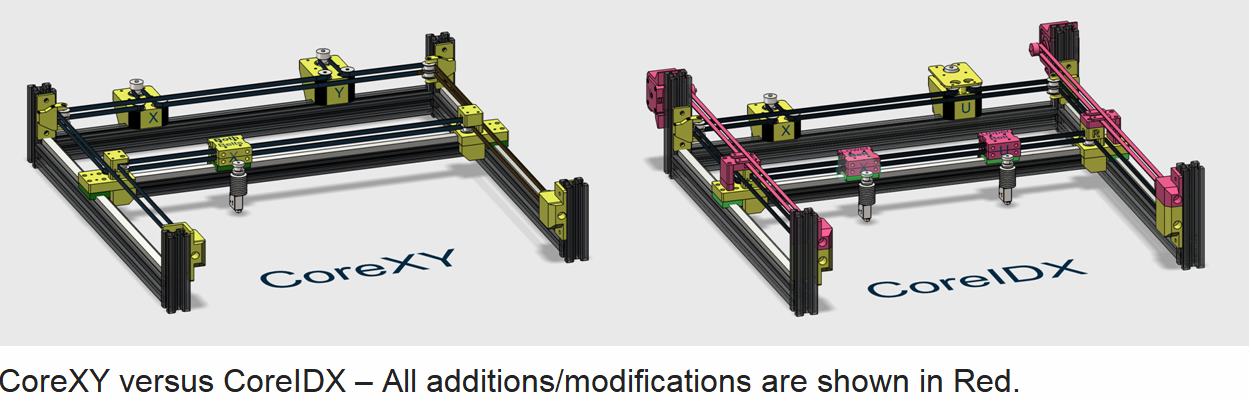](https://postimg.cc/QVWdKmBq) Very little was modified or added to make this conversion as shown in red on the CAD image comparison of CoreXY and Core IDX. This configuration has...
prusaprinters
If you locate all PLA in one drybox and all PETG in another drybox it is also possible to quickly select the filament material as well.Using tube separators like Prusa MMU2 PTFE Tubes Separator is highly recommended - at latest if you are using...
thingiverse
A few Teeny I/O pads line up with the collums, use those when you can. The pcb should lay in the base flush, or very little sticking up, /25mm or so, if it sticks up more than that, like the thickness of a wire it means it's not sitting flush...
grabcad
Once locked into place this plug will not accidentally pull out.Additional configurations include general area cord caps, weatherproof cord caps, shore power cord caps, weatherproof NEMA 3R/4 in-line step-down transformers, and explosion proof NEMA...
thingiverse
Means continuous lines and less retractions on small features on first layer. Acts as a raft for the hexagonal mesh which should be consistent within three layers or so. Less risk of failed prints. Corrected position of the groove the washer...
prusaprinters
The brace is a good place to start with, tightening one screw from each side until you are satisfied with the parts alignment.In case the sides wobble, tighten the Base Post screws a bit more, don't overdo it. Changelog(24/03/2021) v1 of...
prusaprinters
I wanted the walls and areas around screws to be solid..2mm Layer Height4 Shells.4mm Line width5 bottom layers5 top layers20% InfillPrinted all the chain links together duplicated as a single print job. I printed a few extra just in case any had...
thingiverse
Recommended Gyroid 5% or cubic sub 5-10% • vstab Print list • Line height: .2mm • Wall: .4mm • Infill: 0 • bottom: 2 • Top: 0 Files with above profile • Fuse 2- 6 • Fuse 7 - optional infill 10% • Aileron 1 L - no vase mode - 8 bottom layers, 0 top. 2...
thingiverse
I personally dint use CNC, I just hand-drawn the lines on HDF boards from a hardware store and cut out the shapes using a vibration saw. Holes are drilled using a 6 mm wood drilling bit. The paint I used is standard water-based black acrylic paint. ...
thingiverse
http://www.thingiverse.com/apps/customizer/run?thing_id=368375 Instructions Using the following options: custom_back_camera_x_size = 20 custom_bottom_port_x_position = 20 custom_bottom_port_corner_resolution = 8 stencil_rotation = 0...
prusaprinters
and the "loose" tolerance set to .206mmTight = 6.07 mm size holesLoose = 6.20 mm size holes5mmTight = 5.07 mm size holesLoose = 5.20 mm Hole sizes 3D printed piecesThe standard “Embedded Top” and “Embedded Bottom” files have a tolerance of...
prusaprinters
Please let me also know how you rate the design.Unfortunately, the uber fidget ring was deleted due to a design claim, so its no longer available.If you like it, you can check out the original print-in-place fidget ring:or the dual fidget...
prusaprinters
(While facing the front of the case)• Slide the case into position until it either stops or lines up with the front of the rail. (If you feel any resistance you might need to clean up and plastic imperfections around the male or female...
thingiverse
His PayPal account is Liam@FastBikeGear.co.nz To get the full files sent to you please email Liam@FastBikeGear.co.nz with 'VenterMechs' in the subject line. Update 18/03/22: I have now added an alternative option centralised rear bed arm/leadscrew...
prusaprinters
Line up the holes on the bottom of the Wall Mount with the Vertical Stand and insert two 20mm Accessory Pegs to hold it in place. Then slide the little clip (that's included with the Vertical Stand model) down the back of the Wall Mount (long side...
prusaprinters
Please let me also know how you rate the design.Unfortunately, the uber fidget ring was deleted due to a design claim, so its no longer available.If you like it, you can check out the original print-in-place fidget ring:or the dual fidget...
prusaprinters
Please let me also know how you rate the design.Unfortunately, the uber fidget ring was deleted due to a design claim, so its no longer available.f you like it, you can check out the original print-in-place fidget ring:The alternative geared...
prusaprinters
(While facing the front of the case)• Slide the case into position until it either stops or lines up with the front of the rail. (If you feel any resistance you might need to clean up and plastic imperfections around the male or female...
cults3d
Place the BarrelLatch around the RearFrame and line up the larger hole with the Hammer Axis hole, then use the M3x30 screw to connect the BarrelLatch, RearFrame and Hammer together, going all the way through to the other side. You should be able to...
prusaprinters
For PrusaSlicer the test can be downloaded from GitHub: https://github.com/5axes/Calibration-ShapesPrint settings:5 top and bottom layers5 walls + alternative wall with infill25% gyroid infillline width 0.45 mm (outer line can be 0.4 for print...
prusaprinters
Please let me also know how you rate the design.And see the “promotion video” of the other three fidget rings ;-)Unfortunately, the uber fidget ring was deleted due to a design claim, so its no longer available.If you like it, you can check out...
prusaprinters
Also this shape is very special because you can use two V Plate and invert one to create a sort of "wave" that visually connect two I plate that is place up and down.Double C Plate* : This isn't a stand alone plate, this mean this plate is useless on...
prusaprinters
(While facing the front of the case)• Slide the case into position until it either stops or lines up with the front of the rail. (If you feel any resistance you might need to clean up and plastic imperfections around the male or female...
prusaprinters
As for the Data/Sig-line I usually use D4/GPIO02 on the Wemos D1 Mini. Hence, solder a not too thick cable to that GPIO.And you might want to flash your microcontroller before you put it all together. Don't forget about it. Once flashed, I usually do...
prusaprinters
If you can show me the places I really made bad mistakes feel free to show me the correct way and I'll try to fix it. It's close to 7000 lines long with all the web page code included, so cut an amateur with no training some slack. :)</p> <p>I...
prusaprinters
Reaching the yellow line (270° of rotation) would be an acceptable outcome but crossing the green line is ideal. Anything less than that requires recalibration (loosening the nut, exchanging or cleaning the bearings). 06. RemarksLast but not least,...