left astro a4 3d models
105377 3d models found related to left astro a4.
prusaprinters
This should align one of the compartments with the opening on the right (or left depending on how you see it). You then proceed to fill the compartments with the right amount of food (I usually put the device on scales to weigh the precise amount). I...
prusaprinters
Take note of the position of the two ribbon cables (i used post-it to mark them left and right) so you can attach them in the same positions afterwards.4. Screw the touchscreen with two M2x4 screws (exterior side). Don't overtighten them.</p><figure...
thingiverse
 ##TLDR Instructions todo: 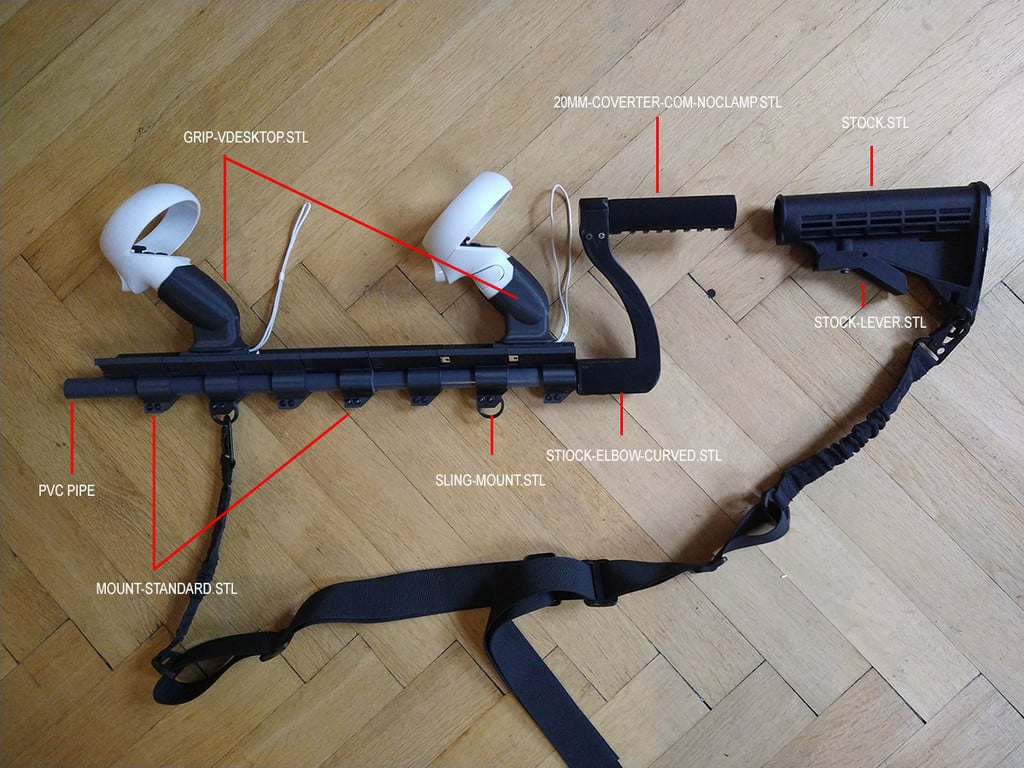 The following...
prusaprinters
If you are unsure this YouTube will detail it out: Swapping wiresSwap the 2 left hand wires OR the 2 right hand wires (not both sets of wires the motor will again turn in the same direction).Firmware changeSebazzz made a great tutorial how to...
prusaprinters
...However, if you wait every 24 hour you will see Secunda moving near a ecliptic plane, in the direction (but faster) that the sky does, leaving Masser from the right side and reaching it on the left side, which means that it is in a retrograde orbit.
prusaprinters
There might be occasional glitches when the filament backs out, like it gets out from the back (doesn't affect much), or it won't get out ( easy fix, since AB has a hot-end quick release design, and it's very easy to clear out the left filament). The...
thingiverse
Creality Printhead Sidefanbox for 40x40x20 Noctua deutsch unten 2021July02: WARNING: my expierence now: perhaps the necessary stepdownconverter 24V to 12V are damaging the upper left chip on the small PCBboard whre the flexible cable comes to the...
cults3d
There might be occasional glitches when the filament backs out, like it gets out from the back (doesn't affect much), or it won't get out ( easy fix, since AB has a hot-end quick release design, and it's very easy to clear out the left filament). *...
prusaprinters
The pieces will usually stay together long enough to get an idea how they look and function.With the object(s) installed on the arc, insert the two enlarged ends of the arc rail in the receiving notches in the half body (see attached photo...
prusaprinters
All hail Stepan83! Materials General Materials Printed Parts - 8pcs your choice 8mm Carbon Fiber Rod OR Threaded Metal Rod M8 x 370mm Violin Bridge - will need sanding like all bridges, but also flattening out of the feet Violin Pickup and Preamp -...
prusaprinters
If you are planning for placing it on the X-min (left side), then the only concern with simply sliding the case to the other side is that positions the cooling fan intake holes toward where the cuts happen instead of facing outward. <i>Perhaps the...
prusaprinters
It exhausts air down the rear left bottom case hole. You also pass the fan power leads through the same hole. ;-) NON PRINT PARTS All the parts are easily available... Filter:The filter is a standard RC56R gas / vapour respirator cartridge filter. At...
thingiverse
I left the original window designs in the files section but marked them as v1. If you choose to use v2 you will need to print 2 each of the window and threaded inserts. The mounting plates are in a separate file now. Print the windows with...
thingiverse
Notes: - I printed all the parts lying down with supports and the panels seem strong and turned out pretty well - I left the supports on the body panels to add strength and to provide a surface to mount inside panels like the old school vinyl on...
prusaprinters
Once fully inserted, the SPA should rotate easily within the holder. If the SPA drags on the inside of the holder, remove the SPA (don't forget to spread the holder open a bit as you pull the SPA out!) and check both parts for any debris or...
prusaprinters
The crank positions must match diagonally so that if both cranks at front left are up, those at front right are down, those at rear left are down and the ones at rear right are up.7) Temporarily fit the EMPTY motor case; line up the two halves and...
prusaprinters
See the picture (lower left) as reference.The Final Step:You're almost there. Let's finish up this maze. Two important tips: </p><ul><li>If your domes have a protective film on them, remove it. </li><li><strong>Don't forget to add the...
gambody
In order to ensure the smooth 3D printed result, Legion’s large Geth Pulse Rifle, various tubes all over its body, the "flashlight head”, hands, the antenna-like attachment on its left shoulder, and some armour elements are now provided as separate...
gambody
The 3D artist also made sure to pay extra attention to Tifa’s intricate vambrace, to the guard on her left elbow, and even to the patterns engraved on the “metal” plates. As expected, the lady’s gloves are equipped with knuckles that make the...
prusaprinters
It Works, I have test it!FeaturesSecured BaseFor me, the most valuable feature is the low profile “Dock” attachment, It properly secures the controller to the table so there is no need to hold it.Four holes to secure itPush in to click-lockPush down...
prusaprinters
Instead clear any debris left in the gap in the Lens using a hobby knife or sharp tweezers until it can push through cleanly.Secure the Door to the Lens using two M1.7 screws. You should now be able to grab the head of the 10mm screw with pliers to...
prusaprinters
This will print all types of 3.00mm fillament, including flexible fillaments, filled (woodfill etc) fillaments, and every specialty fillament that you can put in a fillament extruder. There is a left hand variant, a Prusa I3 Mk2 mount, and a standard...
prusaprinters
I kept dragsterbox's PiCam enclosure and rotating mount, and used the shape of his mounting arm as a guide for the main arm here. Parts: 1.Main arm: Required, mounts to the X Axis motor so the camera moves up the Z axis as printing. 3.Extender:...
thingiverse
Use 4 4-40 screws to attach the "Center Connector" to the left & right handles in the back, 2 screws each. 2. After the Center Connector and handles are screwed together, flip the connected pieces over (in the position you would hold the device when...
thingiverse
... <font size="+1"><sup> Like</sup></font> button** and turn that heart red <img src="https://cdn.thingiverse.com/site/assets/like-button-liked.svg">.
gambody
The 3D printing model’s chosen scale is 1:32 for the FFF/FDM version and 1:64 for the DLP/SLA/SLS version.VERSIONS' SPECIFICATIONSFFF/FDM 1.0 version features:- Contains 26 parts;- A printed model is 183 mm tall, 134 mm wide, 305 mm deep;- Tender's...
prusaprinters
The mid left screw will be used for gear clearance adjustment, so just tighten until you feel the resistance of the lock nut for now. Insert a lock nut into the bottom left and bottom right slots of the housing, and screw the motor mount in (not...
gambody
The 3D printing model’s chosen scale is 1:32 for the FFF/FDM version and 1:64 for the DLP/SLA/SLS version.VERSIONS' SPECIFICATIONSFFF/FDM 1.0 version features:- Contains 142 parts;- A printed model is 168 mm tall, 240 mm wide, 448 mm deep;- Gull-wing...
prusaprinters
It is possible (but fiddly) to remove it again with a small screwdriver.If, like me, you don't know anything about knots, this worked well https://www.animatedknots.com/gnat-hitch-knot Final BitsTie the ring onto the end of the left cord and the...
gambody
Even the platform choice is left up to you, so set your imagination loose and dive into memories of your favourite game!ADAPTATION FOR 3D PRINTINGYoRHa A2 Standing Posture figurine for 3D printing is a static assembly model and its moderation and...